| Developing ColdFusion MX Applications with CFML |
|
|
Building Dynamic Forms |
|
| Developing ColdFusion MX Applications with CFML |
|
|
Building Dynamic Forms |
|
The cftree tag lets you display hierarchical information within a form in a space-saving collapsible tree populated from data source queries. To build a tree control with cftree, you use individual cftreeitem tags to populate the control. You can specify one of six built-in icons to represent individual items in the tree control, or supply a file path or URL to your GIF image.
Note: The cftree tag requires the client to download a Java applet. Downloading an applet takes time; therefore, using cftree can be slightly slower than using an HTML form element to retrieve the same information. In addition, browsers must be Java-enabled for cftree to work properly.
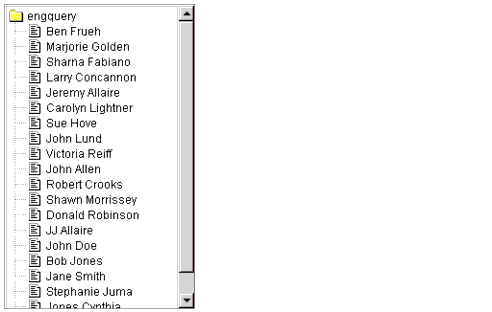
ColdFusion page with the following content:<cfquery name="engquery" datasource="CompanyInfo">
SELECT FirstName + ' ' + LastName AS FullName
FROM Employee
</cfquery>
<cfform name="form1" action="submit.cfm">
<cftree name="tree1"
required="Yes"
hscroll="No">
<cftreeitem value="FullName"
query="engquery"
queryasroot="Yes"
img="folder,document">
</cftree>
</cfform>
tree1.cfm and view it in your browser. The following figure shows the output of this code:
The following table describes the highlighted code and its function:
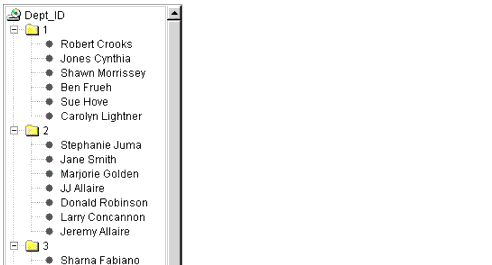
In a query that you display using a cftree control, you might want to organize your employees by the department. In this case, you separate column names with commas in the cftreeitem value attribute.
<!--- CFQUERY with an ORDER BY clause --->
<cfquery name="deptquery" datasource="CompanyInfo">
  SELECT Dept_ID, FirstName + ' ' + LastName
  AS FullName
  FROM Employee
  ORDER BY Dept_ID
</cfquery>

<!--- Build the tree control --->
<cfform name="form1" action="submit.cfm">

<cftree name="tree1"
  hscroll="No"
  border="Yes"
  height="350"
  required="Yes">

<cftreeitem value="Dept_ID, FullName"
  query="deptquery"
  queryasroot="Dept_ID"
  img="cd,folder">

</cftree>
<br>
<br><input type="Submit" value="Submit">
</cfform>
The following table describes the highlighted code and its function:
The cftreeitem comma-separated img and the value attributes both correspond to the tree level structure. If you leave out the img attribute, ColdFusion uses the folder image for all levels in the tree except the individual items, which have bullets.
The cftree tag lets you force a user to select an item from the tree control by setting the required attribute to Yes. With or without the required attribute, ColdFusion passes two form variables to the application page specified in the cfform action attribute:
To return the root part of the path, set the completepath attribute of cftree to Yes; otherwise, the path value starts with the first node. If you specify a root name for a tree item using queryasroot, that value is returned as the root. If you do not specify a root name, ColdFusion returns the query name as the root. If there is no query name, ColdFusion returns the tree name as the root.
In the previous example, if the user selects the name "John Allen" in the tree, ColdFusion returns the following form variables:
Form.tree1.path = Dept_ID\3\John Allen
Form.tree1.node = John Allen
You can specify the character used to delimit each element of the path form variable in the cftree delimiter attribute. The default is a backslash character.
Although the cftree does not include a validate attribute, you can use the required attribute to force a user to select an item from the tree control. In addition, you can use the onvalidate attribute to specify your own JavaScript code to perform validation.
Tree controls built with cftree can be very complex. Knowing how to specify the relationship between multiple cftreeitem entries helps you handle the most complex of cftree constructs.
The following example consists of a single root and a number of individual items:
<cfquery name="deptquery" datasource="CompanyInfo">
  SELECT Dept_ID, FirstName + ' ' + LastName
  AS FullName
  FROM Employee
  ORDER BY Dept_ID
</cfquery>
<cfform name="form1" action="submit.cfm">
  <cftree name="tree1">
    <cftreeitem value="FullName"
    query="deptquery"
    queryasroot="Department">
  </cftree>
<br>
<input type="submit" value="Submit">
</cfform>
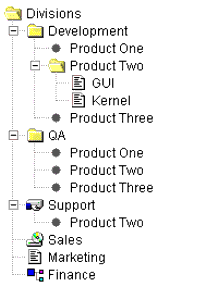
The following figure shows an example of a multilevel tree:
When populating a cftree, you create the multilevel structure of the tree by specifying a parent for each cftreeitem in the tree. The parent attribute of cftreeitem allows your cftree to show relationships between elements in the tree.
In this example, every cftreeitem, except the top level Divisions, specifies a parent. For example, the cftreeitem Development specifies a parent of Divisions.
The following code populates the tree directly, not from a query:
<cfform name="form2" action="cfform_submit.cfm">
<cftree name="tree1" hscroll="No" vscroll="No"
  border="No">
  <cftreeitem value="Divisions">
  <cftreeitem value="Development"
    parent="Divisions" img="folder">
  <cftreeitem value="Product One"
    parent="Development">
  <cftreeitem value="Product Two"
    parent="Development">
  <cftreeitem value="GUI"
    parent="Product Two" img="document">
  <cftreeitem value="Kernel"
    parent="Product Two" img="document">
  <cftreeitem value="Product Three"
    parent="Development">
  <cftreeitem value="QA"
    parent="Divisions" img="folder">
  <cftreeitem value="Product One"
    parent="QA">
  <cftreeitem value="Product Two" parent="QA">
  <cftreeitem value="Product Three"
    parent="QA">
  <cftreeitem value="Support"
    parent="Divisions" img="fixed">
  <cftreeitem value="Product Two"
    parent="Support">
  <cftreeitem value="Sales"
    parent="Divisions" img="cd">
  <cftreeitem value="Marketing"
    parent="Divisions" img="document">
  <cftreeitem value="Finance"
    parent="Divisions" img="element">
</cftree>

</cfform>
The default image displayed in a tree is a folder. However, you can use the img attribute of cftreeitem to specify a different image.
When you use the img attribute, ColdFusion displays the specified image beside the tree items. You can specify a built-in ColdFusion image name, the file path to an image file, or the URL of an image of your choice, such as http://localhost/Myapp/Images/Level3.gif. As a general rule, make the height of your custom images less than 20 pixels.
When populating a cftree with data from a cfquery, you can use the img attribute of cftreeitem to specify images or filenames for each level of the tree as a comma-separated list.
The following are the ColdFusion built-in image names:
Note: You can also control the tree appearance by using the lookAndFeel attribute to specify a Windows, Motif, or Metal look.
The href attribute in the cftreeitem tag lets you designate tree items as links. To use this feature in a cftree, you define the destination of the link in the href attribute of cftreeitem. The URL for the link can be a relative URL or an absolute URL as in the following examples.
<cfform action="submit.cfm">

<cftree name="oak"
  highlighthref="Yes"
  height="100"
  width="200"
  hspace="100"
  vspace="6"
  hscroll="No"
  vscroll="No"
  border="No">

  <cftreeitem value="Important Links">
  <cftreeitem value="Macromedia Home"
    parent="Important Links"
    img="document"
    href="http://www.macromedia.com">
  <cftreeitem value="ColdFusion Home"
    parent="Important Links"
    img="document"
    href="http://www.coldfusion.com">
</cftree>
</cfform>
The following table describes the highlighted code and its function:
When a user clicks on a tree item to link to a URL, the cftreeItemKey variable, which identifies the selected value, is appended to the URL in the following form:
http://myserver.com?cftreeitemkey =selected_value
Automatically passing the name of the selected tree item as part of the URL makes it easy to implement a basic "drill down" application that displays additional information based on the selection. For example, if the specified URL is another ColdFusion page, it can access the selected value as the variable URL.cftreeitemkey.
To disable this behavior, set the appendkey attribute in the cftree tag to No.